Swaps Architecture Overview
In this document, you’ll learn what swaps are, swap processes implemented in the Medusa backend, and a swap’s relation to other entities.
Overview
After an order is created and fulfilled, the customer may need to replace an item they received with another. They can then create a swap, requesting to return an item they have in place for a new item. The swap, similar to an order, can then be paid, fulfilled, and more.
The Medusa core provides the necessary implementation and functionalities that allow you to integrate swaps in your store and automate the Return Merchandise Authorization (RMA) flow.
Swap Entity Overview
Some of the attributes of the Swap entity include:
fulfillment_status: a string indicating the status of the swap’s fulfillment. Its possible values indicated by the SwapFulfillmentStatus enum can determine whether all items have been fulfilled, shipped, or canceled.payment_status: a string indicating the status of the swap’s payment. Its possible values indicated by the SwapPaymentStatus enum can determine whether the payment of the swap has been captured or refunded.difference_due: An integer indicating the difference amount between the order’s original total and the new total imposed by the swap.- If the value of
difference_dueis negative, that means the customer should be refunded. - If it’s positive, that means the customer must authorize additional payment.
- If it’s zero, then no refund or additional payment is required.
- If the value of
confirmed_at: A date indicating when the swap was confirmed by the customer.canceled_at: A date indicating when the swap was canceled.no_notification: a boolean value indicating whether the customer should receive notifications when the order is updated.allow_backorder: a boolean value indicating whether a swap can be created and completed with items that are out of stock.
There are other important attributes discussed in later sections. Check out the full Swap entity in the entities reference.
How are Swaps Created
In Medusa, Swaps are created by the customer through the storefront. This ensures an automated Return Merchandise Authorization (RMA) flow. This section explains the ideal and recommended process, but you’re free in how you choose to implement Swaps creation flow.
Idempotency Key
An Idempotency Key is a unique key associated with a swap. It is generated when the swap creation process is started and can be used to retry the swap creation safely if an error occurs. The idempotency key is stored in the Swap entity under the attribute idempotency_key.
Keep in mind that the idempotency key stored in the swap is only used when creating the swap. All operations related to the swap’s cart and its completion use the cart’s idempotency key.
You can learn more about idempotency keys here.
Swap Creation Process
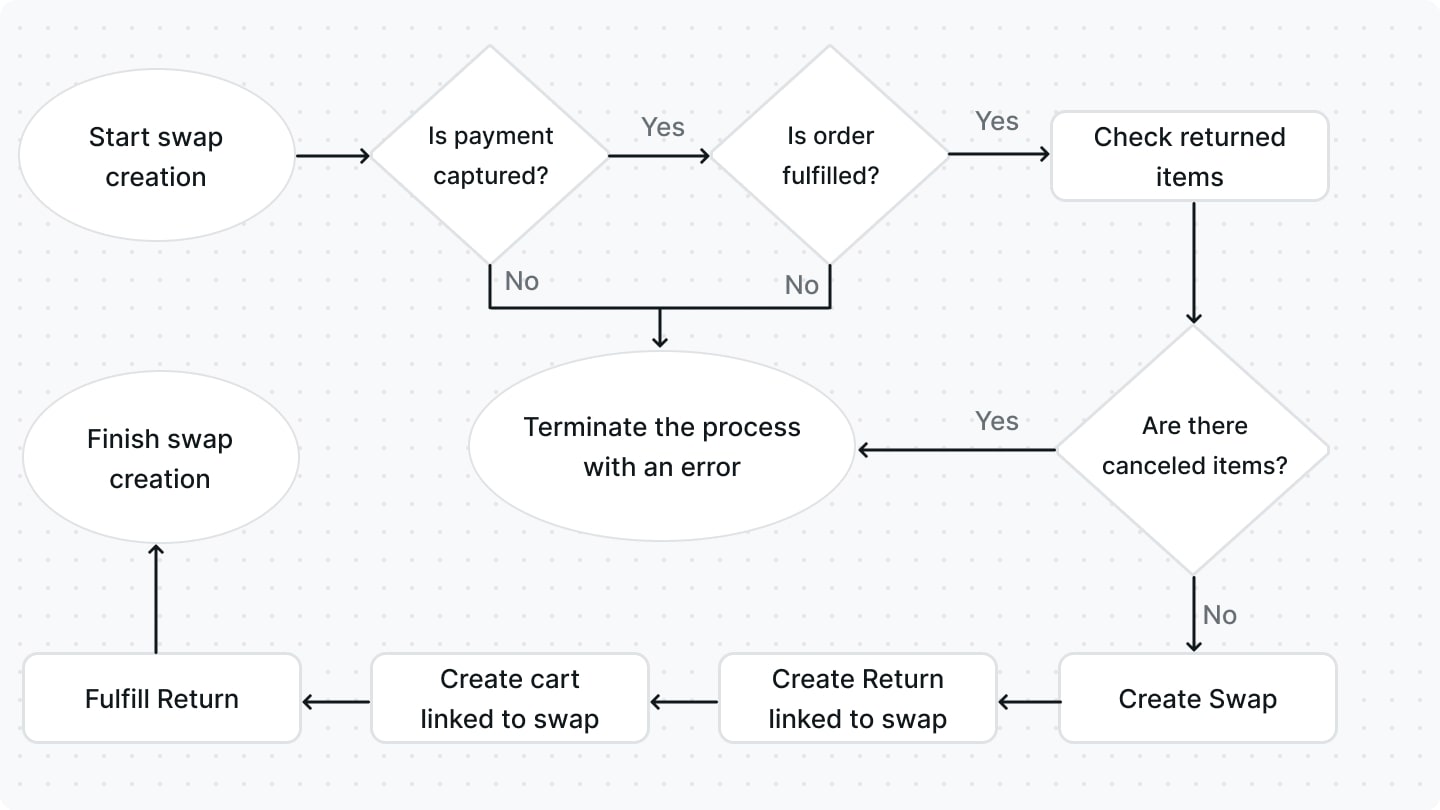
The customer starts by creating their swap, which can be done through the Create Swap API Route. In this API Route, the following steps are implemented:

- The swap’s creation is initiated with the
SwapService's create method:- The order is first validated to see if a swap can be created. This includes checking the
payment_statusof the order to ensure the payment has already been captured, and thefulfillment_statusof the order to ensure the status isn’tnot_fulfilled. If any of these conditions aren’t met, the process is terminated with an error. - The items that the customer chose to return are then validated. If any item has been previously canceled, meaning that its order, swap, or claim have been previously canceled, the process is terminated with an error.
- If all the conditions above are met, the swap is then created and associated with the order using the
order_idattribute. - A return is created and linked to the swap. The return’s items are set to the items that the customer chose to return.
- The order is first validated to see if a swap can be created. This includes checking the
- After the swap has been created, a cart is then created for the swap using the
SwapService's createCart method. The cart is used to finalize the process of the swap creation process, but more on that later. The swap is associated with the cart using thecart_idattribute. - The return associated with the swap is marked as fulfilled, as this is taken care of by the customer.
After the swap has been created, the customer should undergo a swap-completion process similar to the checkout process where they provide shipping and billing addresses, choose shipping and payment methods, authorize any additional payment required, then finally completing the cart.
This is all made possible since the swap is linked to a cart, so the same checkout flow can be implemented in a swap context. The cart completion strategy also handles the completion differently for swaps, as explained here.
Handling Swap Payment
After the swap has been created and completed by the customer, the merchant can then process the payment of the swap. This includes either refunding or capturing an additional payment, which is decided by the value of the difference_due attribute as explained in the Swap Entity section.
The processing of the swap’s payment can be done either using the SwapService's processDifference method, or using the Process Swap Payment API Route.
If the swap requires any additional payment, the customer is expected to have authorized the payment during the swap and cart completion flow explained earlier. The merchant can then capture the payment and the payment_status of the swap is set to captured.
If the swap requires a refund, the merchant can refund the payment to the customer and the payment_status of the swap is set to difference_refunded. The same status is used if no refund or additional payment are required.
If the capturing or refunding of the payment causes any errors, the payment status is changed to requires_action.
A swap’s payment can be accessed by expanding the payment relation and accessing swap.payment. A payment is represented by the Payment entity.
Handling Swap Fulfillment
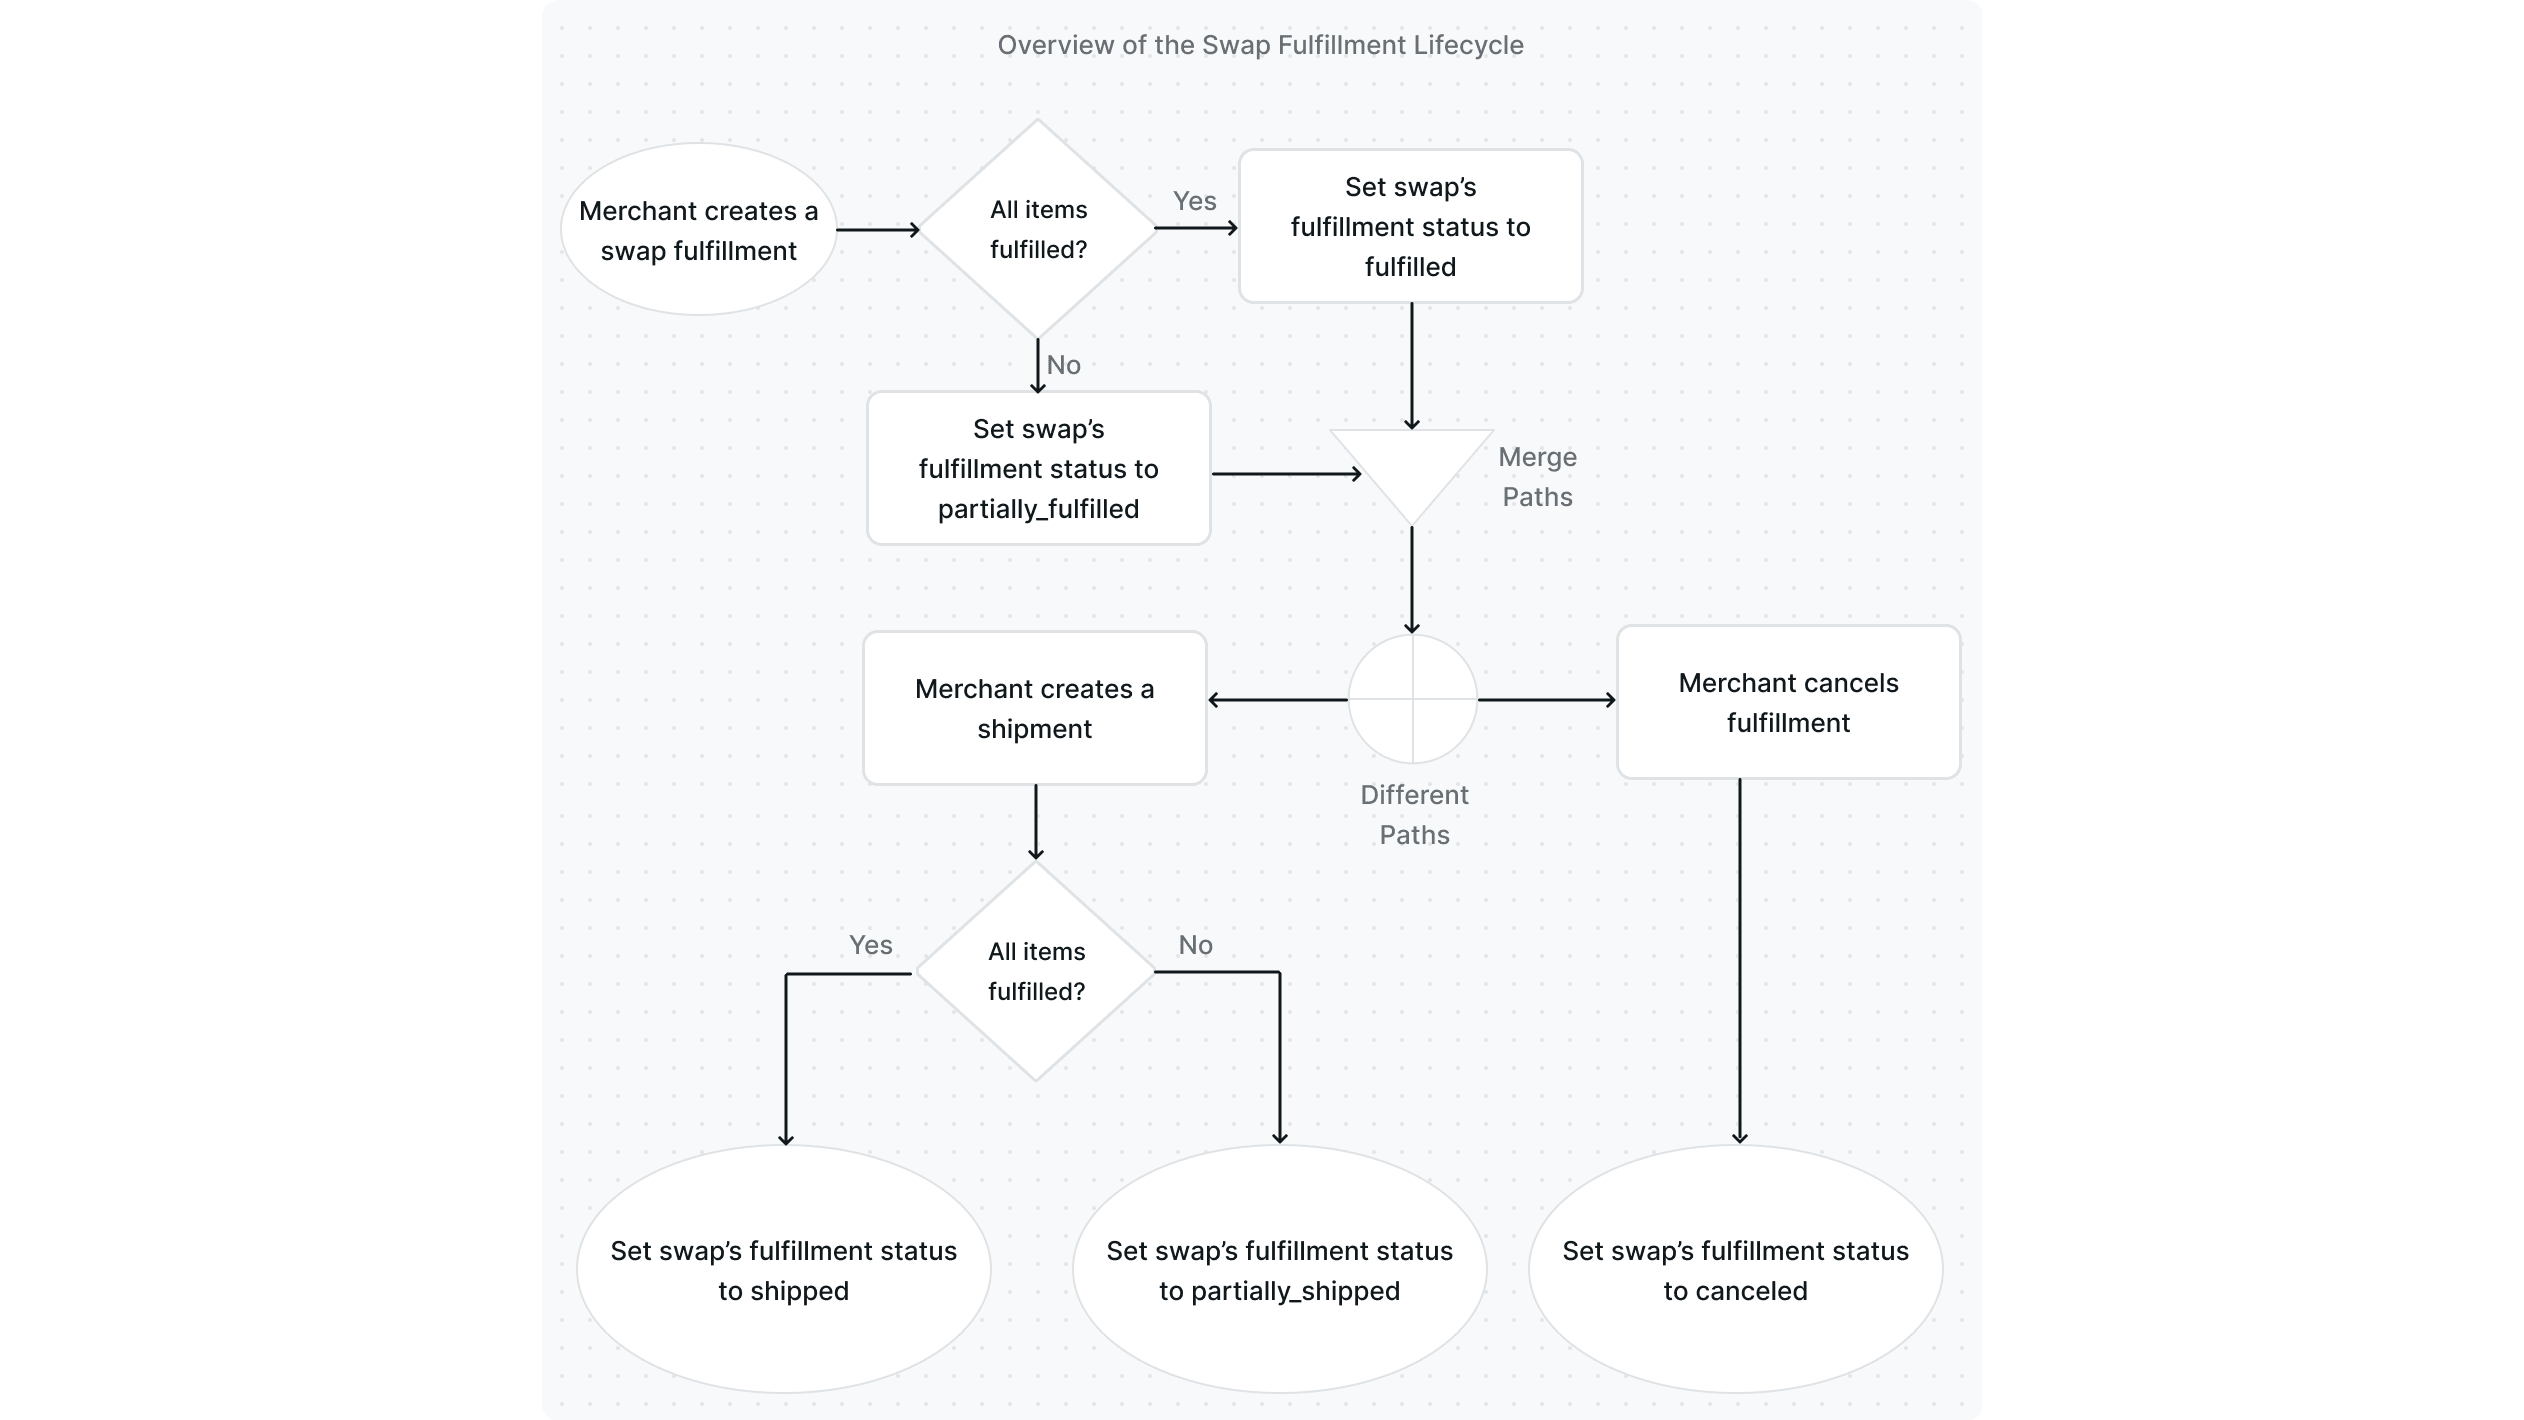
After the swap has been created and completed by the customer, the merchant should handle the fulfillment of the new items.
Although you have freedom in how you implement the process, the recommended process provided in the Medusa backend is as follows:

- The fulfillment is created either using the
SwapService's createFulfillment method or using the Create a Swap Fulfillment API Route. This would set thefulfillment_statusof the swap either tofulfilledif all items have been fulfilled, orpartially_fulfilledif only some items were fulfilled. - The shipment can then be created using the
SwapService's createShipment method or using the Create Swap Shipment API Route. This would set thefulfillment_statusof the swap either toshippedif all items have been shipped, orpartially_shippedif only some items were shipped. - Alternatively, a fulfillment can be canceled after it has been created using the
SwapService's cancelFulfillment method or using the Cancel Swap’s Fulfillment API Route. This would set thefulfillment_statusof the swap tocanceled.
A swap’s fulfillments can be accessed by expanding the fulfillments relation and accessing swap.fulfillments. A fulfillment is represented by the Fulfillment entity.
Handling a Swap's Return
A swap's return can be marked as received, which would adjust the inventory and change the status of the return. This process is explained within the Returns documentation.
Canceling a Swap
A swap can be canceled by the merchant if necessary. It can be done either through the SwapService's cancel method or the Cancel Swap API Route.
A swap can’t be canceled if:
- The payment has been refunded (the
payment_statusis eitherdifference_refunded,partially_refunded, orrefunded). - Its fulfillment isn’t canceled. You’ll have to cancel the swap’s fulfillment as explained in the Handling Swap Fulfillment section.
- Its return isn’t canceled. You’ll have to cancel the return associated with the swap first before canceling the swap.
RMA Automation with Swaps
Giving the client control over the creation of the swap and handling the returns allows businesses to automate their RMA flow.
The client, typically the customer, creates the swap, authorizes any additional payment required, and handles returning the item. The admin, typically the merchant, can view the created swap, process the payment, and fulfill and ship the additional items.

This removes any friction and support required between the client and the admin.
Relation to Other Entities
This section includes relations that weren’t mentioned in other sections.
Order
The swap must be associated with the order it’s created for. An order is represented by the Order entity.
You can access the order’s ID using the order_id attribute. You can also access the order by expanding the order relation and accessing swap.order.
Cart
The swap must be associated with a cart. A cart is represented by the Cart entity.
You can access the cart’s ID using the cart_id attribute. You can also access the cart by expanding the cart relation and accessing swap.cart.
LineItem
The swap is associated with new items that should replace the customer’s items. These items are represented by the LineItem entity.
You can access the swap’s new items by expanding the additional_items relation and accessing swap.additional_items.
Return
The swap is associated with a return that is created when the swap is created. A return is represented by the Return entity.
You can access the swap’s return by expanding the return_order relation and accessing swap.return_order.
Address
The swap can be associated with shipping and billing addresses. Both shipping and billing addresses are represented by the Address entity.
You can access the swap’s billing address ID using the billing_address_id property. You can also access the billing address by expanding the billing_address relation and accessing swap.billing_address.
You can access the swap’s shipping address ID using the shipping_address_id property. You can also access the shipping address by expanding the shipping_address relation and accessing swap.shipping_address.